My son was really into Pirates around 4 years of age so his birthday party theme was easy to choose.
I think it was mainly school influence as they were playing Pirates in the class and read books related to this subject. His class must be mainly boys as I can't remember my daughter ever learning about Pirates in school. It was ALWAYS princesses!


Emilia is our youngest friend I guess but definitely the most funny one! We all love her to bits and I just had to organize something special for her second pregnancy. Since we planned to visit Orangery in Adliya for quiet some time but always something stood on our way I decided this is a perfect occasion to dine there.


I call them ridiculous cookies as they are just too damn easy and yummy. My good friend Jill shared this recipe with me and I was really thinking - it must be joke! I was pretty sure it's one of those things that suppose to be super healthy but turn out to be completely uneatable:( well well I was wrong!

I was really skeptical about that recipe. Sounded like it's way too little ingredients and it will never bake properly. But since it's just 2 ingredients I decided to give it a go cause even if I had to throw all of it in the garbage I would not loose much. So here you go - grab a pen and write it ALL down;)))

RIDICULOUS RECIPE:
- one mashed banana,
- half a cup of oats.

Oh yeah! That's it! You just mash a ripe banana with a fork and add oats. Mix it together with the same fork and form cookies. Recipe makes about 6 cookies. That is just brilliant as I can divide them equally between my two kids so no one has a reason to fight:) I used traditional rolled oats like this and baked it on a non stick silicon pan.


Baking takes 15min and preparing about 1.5min which means you can bake them for kids breakfast before they even get out of bed! Actually that was my idea since I am fighting every morning for the past 4 years with my daughter to eat breakfast. I thought this may be a good idea for something in her stomach before school. Obviously I can't do it every day as it gets boring but once a week is fine. They like it as its really sweet thanks to banana. You can try adding splash of organic honey or sprinkle some cinnamon. Anything really:)

I hope your kids will like it as much as mine did! And to be honest with you I also eat all the leftovers:)


This tradition is new for us and I actually had to Google Easter Bonnet last year. I kinda knew it's a hat but how does it look like? It looked quiet complicated so I was really relieved to hear that kids are preparing their hats in school and will parade in front of their parents later. Uffff. .... but that was last year. This time it was all on me!

I was just about to hit the Pinterest for some inspiration when during a routine visit to a stationery store inspired my daughter to come up with a great idea. She just grabbed a pompom,  put it on her head and said - "mummies - can this be my Easter Bonnet?". Well, well - it was a brilliant idea and she looked so gorgeous with that pom-pom on her head it was a definite go on the project. We left the store with bunch of pom-poms in different colors to choose from and I was really content that we have an idea for Easter Bonnet already. I had all the Easter decoration at home so it looked like we are ready to build it!


So basically this is what we did a day before the school parade. I opened my pom-pom only half way to leave a flat side which I needed to attach to the headband later. You can either buy a ready made pom pom here or you can make it from the scratch using this tutorial.

There is a piece of string in the middle of the pom-pom which I saved to attach it to the headband but unfortunately this didn't work. I needed a flat base to glue the pom-pom on so I cut a piece of cardboard from an old shoe box and fixed the pom-pom on it. Then I run pieces of clear tape around the headband onto the cardboard to keep it tightly fixed. It worked perfectly! I know it's really amateur way of doing it but I get credit for being creative and doing it for the first time:)

I decorated it with anything I had around the house that was springy or Easter y:)  I am sure you can find something like plastic eggs, yellow feathers, small chicks, etc. Anything works really - just go with the flow.


Have a look at all the pictures here if my description seems unclear or confusing to follow. It's really easy project and we got so many complements on how creative and gorgeous it is. It was the only one Easter Bonnet like this in school so really one of the kind design! I'm so proud of my little hat designer who was so happy parading and feeling so wonderful about a great team work she did with her mum.

Ho can we beat it next year??:)


Our last finger paint cooked for messy play date was a total fiasco. I am not too sure if I overcooked it or put too much cornstarch (I was following Pinterest recipe) but it turned out to be a jelly so hard kids couldn't even play with it. This time I decided to skip cornstarch and simplified it a bit. Here is the easiest recipe on Earth!;))

Homemade DIY finger paint:
- 1 cup of all purpose flour
- 1 cup of water
- food coloring

All I did is put it in the pan and mixed it until it all incorporated and reached desired consistency. At this point I knew it can't be too hard and I need to leave it still running as if I store it until the next day it will thicken. I divided the mixture between containers and added some liquid food colorings. Voila!

It turned out to be the best homemade DIY finger paint ever! Although I could use some more food coloring next time to make colors more deep. Kids loved it but not all of them used their fingers to paint. That only shows me the importance of running these messy sessions to work on kids sensory skills which are so important.
I lied down big sheets of paper for kids to use their creativity. They could use fingers or brushes to create their masterpieces. I wish we could frame them after!


It's worth mentioning that this paint is fully edible and washes of any clothes. That's quiet important for mums as I saw few kids licking brushes and their fingers during a playtime:) Well this is how they learn so it's good to allow them explore on their own in a safe environment.

Just give it a try next time you plan a painting session and don't forget to let me know how it was. You can attach picture of your colorful homemade DIY finger paint and share your experiences with playing with it. Would love to hear your stories! Have fun!


Winter is over in Bahrain so we are back with our famous messy play dates at Sticky Fingers! Its all back by popular demand and its so great to see so many children looking forward to get dirty!:) I've always been enjoying these sessions the most so I was very happy to organize it again.

What we have planned for today was:

1. COLORED NOODLES
Pretty simple activity station. All you need is a pack of spaghetti, boil it for just a few minutes and drain. Then add a splash of vinegar and food coloring of your choice. Done and checked!


2. SHAVING CREAM + COFFEE GRINDS
I am saving my used coffee from the pressure coffee machine and keep them in a tight container. They we take an empty bowl and spray it with a lot of shaving cream. Let kids play with it for a bit and then start shifting black coffee on top of it - WOW!!!! They all start screaming!:)


3. SENSORY BIN WITH SOME MARBLES AND COLOURED STONES
That one is a bit tricky as little kids need to be watched at all times so they won't put any of the marbles in their mouths. Its a great activity for kids with some sort of sensory challenges. There is a great book for all those looking to explore this subject more by Lindsel Biel Raising a sensory Smart Child. You will find many useful insights into how to help your child overcome those challenges and more important how to understand the problem to begin with.
All kids need to do here is to dip their hand into differently shaped objects and feel them in their hands. Twist them around, stir and feel the shapes, textures and even temperatures as marbles and stones were reacting differently to sun exposure. Great fun!


4. LITTLE INFLATABLE PUDDLES
That part was put last minute by me and was a biggest hit. Kids would jump in it with their shoes, put their hands inside, cook stuff, eventually they put all the noodles inside, coffee grinds and made muddy puddles from Peppa the Pig! Giggles and smiles all over our garden!


5. LOTS OF PAINTING ON THE FLOOR - FLATTEN BOXES AND BIG SHEETS OF PAPER
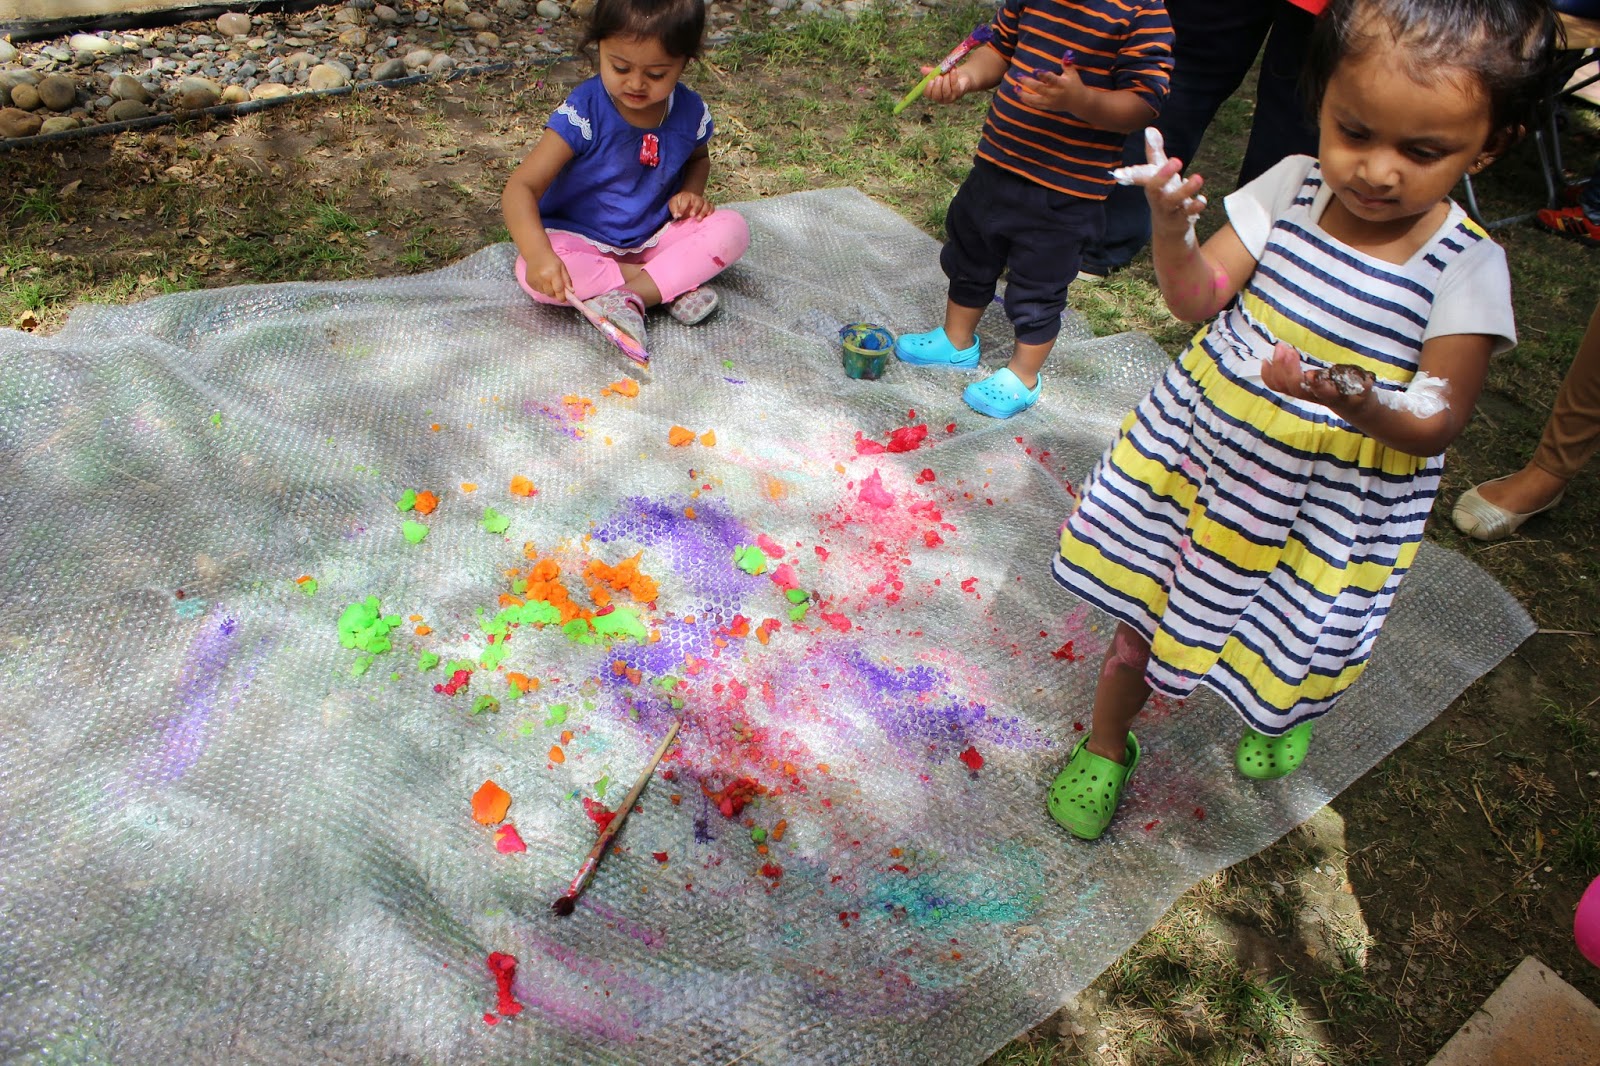
Messy play date means you must get dirty so painting all over your body is a way to go! Kids were a bit shy at first but then opened up and started their art work. It was gorgeous! I had bought big brushes - not the kiddy ones - so they can grab easily and paint a huge surface at once. I had about 5 different colours of paint so they won't get bored easily and can also mix colours to see what happens. When the paint was finished I came with a water spray and add some water to their canvas - they loved it as they could brush more and more over it and smash all the colours together! Kids are always ready for more!


6. Sand box
Unfortunately my sand box is getting smaller every time as kids tend to shift the sand everywhere around but not IN the box:) Anyway I am using a proper kids playing sand instead of our dessert Bahraini sand. That was it is way cleaner for kids and it has a better texture. It is really not that expensive and more fun with it.


7. HOMEMADE FINGER PAINT
Well here I dropped a ball a bit. I took a recipe from Pinterest and it wasn't what I expected. Maybe I overcooked it but it was more like a gel than paint. All we could do with it is take it out of the boxes and rub it with our fingers on a bubbly surface. Fun anyway! I got a bubble wrap to put on the grass as I wanted kids to touch it with different materials like paint, jelly, shampoo, baby oil, etc. It was a good experience and practice for their sensory skills. Quiet interesting to see kids reaction when I started to pour shampoo on it - they were all thinking "ITS NOT ALLOWED TO SPILL STUFF!! WHAT IS SHE DOING?!?". Only after a few minutes they would copy me and enjoy it tremendously!:)

8. WATER BUCKET
Simple and easy but super messy! That water as used for literally everything - washing hands, pouring water out and watering flowers, spilling water over friends head, making rain, etc. Or you could just pour some water into your sandals and see where it goes:) Kids imagination is truly endless. I had to refill the bucket few times with some fresh water (from the pool:) but it was the most popular messy station. Next time I might have to add 1 or 2 more buckets if we continue to be that busy!:)


Kids and mums were warned they need to bring hat, sunscreen and old clothes plus a spare set to change later. Kids creativity in a house of no rules is beyond any adult understanding so they all looked pretty dirty afterwards.Tired and happy play date lasted for about 2.5h as we finished inside with some dancing and music. Everyone had some juice and biscuits and went home to take a loooong nap.

If you need any more inspiration and to see what we've been up to in terms of mess please check out our previous posts from Messy Play Date here: Year End Messy Play Date and Sticky Fingers Mess.

Next week more mess ladies?


I've been obsessed recently with kids savoir vivre. I am just looking around and I don't like what I see. I have to admit I think I wasn't consistent enough with my own kids and I was giving up way too quickly. Partially because I was too tired to fight and talk them into doing things they just didn't want to do and partially because somehow I couldn't see the long term effect of "just letting go" today. But I feel back on track and heavily educating myself now!

Surprisingly enough there is not so much on the market which specializes for kids only. Lots of general articles that are just a common sense but the question is - HOW to break it down for a 5 year old? Or even for a 1 year old? Its a hard work I must admit but if we set right examples and mostly show them what needs to be done big chance is they will follow us. Eventually. Or at least it will be engraved in their subconscious and will come back when they are adults. Let's hope for it!

Today I am going to talk about my first challenge with my first child. She was taken care of by a nanny as I was a working mum back then so her first 18 months (I returned to work when she was 4 months old) was spent with a caregiver. I hate to blame anyone and I have to say that our nanny was this sweet Philipina having her own grandkids already. She absolutely adored Maja and I was perfectly satisfied with her work. My daughter was always happy with her and missed her on the weekends. However different culture brings different traditions and standards. Especially when it comes to eating habits. I knew for fact that my daughter was constantly fed in front of the TV, in her high chair or she was chased on the playground by a nanny with a spoon so she will just take another bite. Not to mention that she would never see her nanny eating with her so she would never know how it should be done. Our weekend attempts to go out and eat in a restaurant were never successful as Maja would just not eat anything and then cry to demand TV to be on. Being a hard working mum I was just telling myself that as long as she is fed and happy no harm done. But now I see the long term effect of that and it took me a little bit more that 2 years to turn it around. Can you image? 2 years of fighting and kid tantrums and her refusing to eat for 2 weeks just cause I wanted her to sit at the table without a TV on. Ahhhh....Good thing is that I was successful and I am so proud for both of us! Maja is almost 6 years now and she can hold a small talk with a stranger at a table which makes my heart jumping up and down. She is a naturally shy girl so that is a fantastic achievement!

Now I can easily advise your mothers to start etiquette lessons with their children as soon as possible. It is never to early to teach a little one table manners, how to look good or how to take care of your own hygiene. I strongly believe it is extremely needed in the present society when people just generally don't care and the highest value is just to be happy and have a lot. But its our job as mothers to ensure that our kids will be respected adults with many people around them who can then become their business partners, friends or husbands/wifes. I would like to highlight the importance of raising a polite person who knows how to use good manners in the right situations to benefit them. Its all about basics but that requires time spend with your child and its never ending education. As they get older there is more and more to learn as how to throw a tea party for your friends for example. How to attend a sleep over? Gift receiving and giving? How to respect adult conversation and do not interrupt? Greetings and magic words like "thank you" and "please" which are basics but how about adding "nice to meet you" at the end of a conversation? You progress with your child as they get older and build on it. Cause really - what are we teaching our kids these days? Only math and science won't help if they won't be able to treat their boss with respect in order to get a promotion, right?

There are so many subjects that can be taught to a young human being but setting an example is the best way. Kids always copy us - especially young ones. So why not using this opportunity to teach? Sounds easy, right? Maybe we can learn something along the way?

Watch this space as I will bring more topics and solutions which are tested on my own kids!:)


We are happy to announce new activity at Sticky Fingers - Mini Me Yoga. We just run our first session this week and it was a great success. I would love to share with you my experience so far as Mini Me Yoga Ambassador and explain all the wonderful benefits of that program for you and your child.

I was looking to expand for quite a while and searching for a suitable activity that I truly believe in. When I came across Mini Me Yoga program I was pretty sure this is what I was looking for. On top of that when I tested it on my daughter and son (age 5 and almost 4) their reaction confirmed my feelings. They were sold on Yoga and now demanding (especially my daughter) that we do this every day. I had a goal then and needed to get my knowledge.

I decided on Mini Me Yoga Ambassador program as I thought that once I will get my confidence in teaching kids I might take an opportunity to teach 2h Workshop for grown ups. During the training I've met some great people who inspired me and stay in touch in case I have any questions or if I need reassurance. It one of the best parts of Mini Me Yoga - being a part of a community.
Have a look at our fun program and happy, focused kids!


No some details about the program and how it all started. Since launching into the global market in November 2013, Mini Me Yoga has grown from 1 to 19 countries. It has been an amazing journey. The founder of Mini Me Yoga Kate Bartram - Brown said 'I couldn’t have conceived how powerfully the message we were delivering would be received and so quickly. It’s been truly extraordinary. Here’s why.

Mini Me Yoga empowers parents, teachers and other childcare's how to bring 15 minutes of Yoga, positive thinking & mindfulness into a child’s life. This is taught through a 2 hour interactive, stimulating and fun workshop.

She created this programme when she was living in Bahrain 6 years ago. As a kids yoga teacher, Kate found that simple techniques helped children through stressful and volatile times. As the situation became untenable, her husband and Kate made the decision to leave. It was at that time, she decided to launch the workshop in the USA and UK with other countries organically following. The workshops are taught by Mini Me Yoga ambassadors of which there are around 90, and counting!

Mini Me Yoga program was successfully brought into schools, playgroups, community centers, groups of mummies and individuals. However Kate soon realized that it wasn’t always easy for people to access a workshop, so she wanted to bring the workshop to them. Henceforth the book was born!

The book is the tool that enables to share these invaluable techniques to a much wider audience.
Since Kate and her husband are now based mainly in London, and is now their home, it is the perfect place to launch the book.

At the launch,  there will be a prestigious guest speaker, Matt Thornton, Director of the Emoto Peace Project UK which is testament to his belief to their unique project. Dr Emoto world renown water researcher and New York Times Best Selling author of “The Messages from Water” “The Hidden Messages in Water”, “The Shape of Love”, “The True Power of Water” and “Love Thyself” passed away last year but his work around the world bringing peace through water, lives on through his dedicated team, of which Matt heads up in the UK. www.facebook.com/emotopeaceprojectuk . Kate is most excited to be welcoming him to this event.

Mini Me Yoga ethos is very much to have fun by bringing people together by celebrating our new and innovative ways of educating children to become happy individuals as they develop through life… and all that they may bring. To place this book in a more familiar literary genre, I guess you could say it’s a ‘self- help’ book for families. But don’t take my word for it, try it!
The book is available on Amazon.


Also if you wish to follow all our news make sure to "Like" our FB page at Twisted Mini Me Yoga. I will be keeping you updated on all the Workshops coming and all the news we may have. Hope you will enjoy this as much as we do!

Namaste!